
Mailing Pieces
Details for each individual piece of mail in the mailing are entered here. This is the third section to complete when you describe your Mailing.
Click Add
A new window will appear.
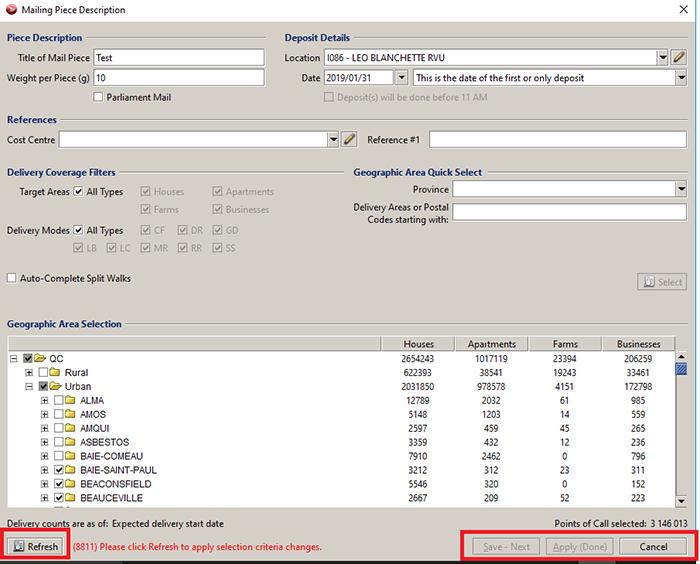
You must enter the Mailing Piece information to the Mailing Piece Description pop up.
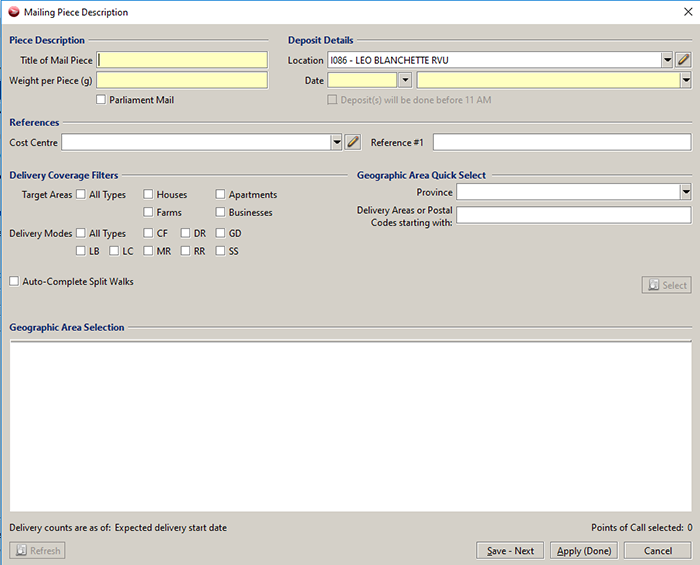
The Mailing Piece Description consist of five sections.
- Piece Description
- Deposit Details
- References
- Delivery Coverage Filters
- Geographic Area Quick Select
Note: a Mailing can have numerous Mailing Pieces.
Enter the required Mailing Pieces information.
Piece Description
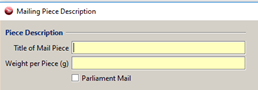
Title of Mail piece: required, enter the title of the mail piece (maximum 30 characters). Note: if there is more than one mail piece type in this mailing, and they have different titles, the Mailing Pieces Table will display "Yes" in the Version Specific column.
Weight per Piece (g): required, enter the weight of the mail piece in grams. Format 99999.99
Parliament Mail: optional, only displayed if this is available for your contract. Select if the mail piece is parliament mail.
Deposit Details

Location: select the location where this Mailing Piece will be deposited. The list displays the Favourite Postal Outlets that have been selected in your data maintenance. You are able to edit this list by clicking on the edit icon  .
.
The Data Maintenance Favourite Post Office will open.
For more information on setting up Favourite Post Offices see the Help topic: Favourite Post Offices
Note: You are able to enter a different location per Delivery Installations (downstream entry). This is done in the Review Mailing Plan tab.
Date: select the date this mailing piece will be deposited or the date delivery is to start. The date must be a business day; cannot be a Saturday, Sunday or Holiday in the Province of the Deposit Location. Note: You are able to enter a different date for specific Delivery Installations (partial mailing). This is done in the Review Mailing Plan tab.
Type of Date: identifies what the date represents. Select either:
- This is the date of the first or only deposit (delivery to start Upon Receipt)
- This is the date when delivery must start
Deposit before 11: this influences the calculated deposit date when a specific start date mailing is deposited directly to a delivery installation.
References

Cost Centre: optional, select a Cost Centre for this Mailing Piece. The list displays the Cost Centres that have been defined for the Mailed on Behalf of Customer and your workgroup if applicable. You are able to edit this list by clicking on the edit icon ![]() . The Data Maintenance Cost Centre will open.
. The Data Maintenance Cost Centre will open.
For more information on setting up Cost Centres see the Help topic: Cost Centres
Reference #1: optional, enter a reference (maximum 20 characters). This applies to the mailing piece and is printed on the container label.
Delivery Coverage Filters & Geographic Area Quick Select
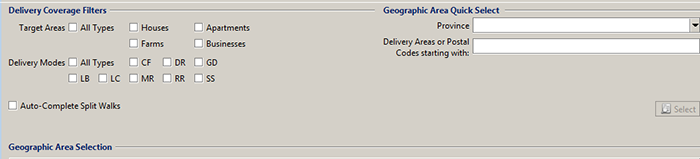
Delivery Coverage Filters and Geographic Area Quick Select are the geographical area selected for your mailing (i.e. Province, Rural or Urban, the FSA's/Postal Codes, Delivery Installation Name and Delivery Modes to deliver to). This determines the types of dwellings where the mail is to be delivered.
Note: It is to your advantage to Save Template if you will be creating similar mailings again. Once you have saved a template you are able to create a new Mailing from a Template later and the Delivery Coverage and other fields will be pre-populated.
Target Areas: At least one must be selected
- All types: Select if delivery is required to all target areas: Houses, Apartments, Farms, and Businesses
- Houses: Select if delivery is required to houses. A point of call category that includes residential dwellings that may be detached, semi-detached or attached in a row. These dwellings have separate entrances and may be horizontal (in a row) or vertical (one on top of the other). Examples: single family house, row townhouses, stacked townhouses, and duplexes.
Note: If a business is operated from a house that is also used as a residence, the point of call is to be classified as a house. - Apartments: Select if delivery is required to apartments. A point of call category that includes self-contained* residential units within a high-rise or low-rise multiple-unit building of three or more such units, that share a common main entrance to the building. Examples: rental apartments, condominium apartments, multi-unit private retirement residences.
Note: If a business is operated from an apartment which is also used as a residence, the point of call is to be classified as an apartment.
* Self-contained unit: A self-sufficient, complete and independent unit that has the same domestic features of a house that are not shared with other units (containing own bedroom(s), kitchen, bathroom(s), living area). - Farms: select if delivery is required to farms. A point of call category that includes residential and business buildings associated with a defined area of land (ex. fields) used to raise crops, animals or fish.
Note: The point of call does not necessarily have to belong to any farming association to be classified as a farm. - Businesses: Select if delivery is required to businesses. A point of call category that includes buildings and structures where the primary activity is commercial, industrial or institutional (institutional includes but is not limited to churches, hospitals, nursing homes, and schools).
Note: If a business is operated from a house or apartment which is also used as a residence, it is to be classified as a house or apartment as the case may be.
Delivery Modes: At least one must be selected. Delivery Modes are the type of delivery routes used to deliver the mail.
- All Types
- CF: Call For
- DR: Direct
- GD: General Delivery
- LB: Letter Box
- LC: Letter Carrier
- MR: Mobile Route
- RR: Rural Route
- SS: Suburban Services
Auto-Complete Split Walks: select if you wish split-walks are to be completed when generating a mailing plan.
All Points of Call: this is only available to specific contracts. Select if the mailing is to be delivered to those who have opted not to receive Neighbourhood Mail (i.e. election information)
Note: Consumers Choice is defaulted when not selected.
Geographic Area Quick Select: enter information here to search for Delivery Installations to view or modify if required.
Province: select All, or a specific Province or Territory.
Delivery Areas or Postal Codes Starting with: (maximum 30 characters) Enter a delivery area (i.e. Ottawa) or Postal Code starting with these characters.
Select: Click  once you have entered search criteria. The results will populate the Geographic Area Selection section.
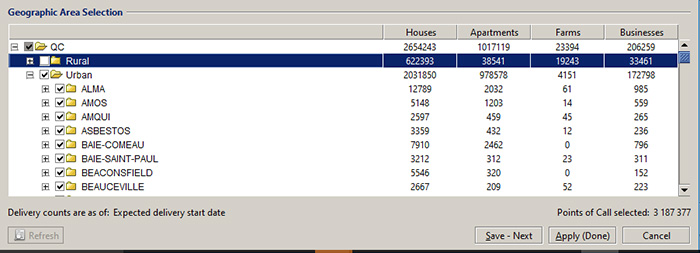
Geographic Area Selection: This table allows you to drill down and select the area where this mail piece will be delivered.
Number of Points of Call selected: displays the number of Points of Call selected in the Delivery Coverage. The Points of Call are derived from the latest householder counts for the expected delivery start date.
Note: When you enter a deposit date in the mailing pieces section of the Describe Mailing tab, the delivery start date for each of the Delivery Installations (DI) in your selected coverage is calculated. In turn, the correct counts are shown for the DI based on the expected delivery start date from current or pending householder data.
For more information please visit Delivery Counts and Maps.
To select a geographic area:
- expand / contract the geographic area at one of the five levels available:
- Province,
- Rural or Urban,
- Postal Delivery Area (urban) or FSA (the first three letters of a postal code, rural),
- FSA (urban) or the full Postal Code (rural),
- Secondary Delivery Installation Name and Delivery Modes.
- Select the area(s) you wish to include.
 Any left blank will not be included
Also displayed is the date of Delivery Counts valid date and the total Points of Call selected number based on the selected geographic areas.
Refresh: this is enabled if you have modified information or the counts displayed have been imported and need to be refreshed. Note: you will receive a message if a Refresh is needed.
Save-Next: to continue the process of adding your next new Mail Piece Description.
Apply (Done) once you have entered the required information, click Apply (Done) to add these details to the mailing. The Mailing Piece Description window will close and the information will appear Mailing Pieces table.
Cancel: will cancel any entries or modifications you have made and close the Delivery Coverage.
Add the Mailing Piece to the Mailing
Note: The information in the table is display only. If required you are able to Update, Cancel or Delete a Mailing Piece from the Mailing Pieces Table. Please see the help topic: Mailing Pieces Table for information.
Next Step: Mailing Pieces Table
Mailing Pieces Table
Each line displayed in the Mailing Pieces table represents a Mailing Piece either added from the Mailing Pieces section or imported from a Mailing Plan. The information displayed in the table is read-only. To view details and/or modify any Mailing Piece that is displayed in the table you must select a Mailing Piece line in the Table and the details will populate in the Mailing Pieces section.
Note: The Mailing Pieces Table will automatically be populated with one or more lines when you import from a Mailing Plan.
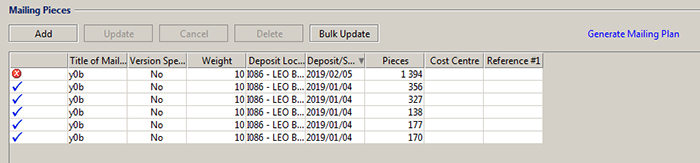
Once a Mailing Piece has been added to the table you have the option to:
- Add another Mailing Piece,
- Update a Mailing Piece. If you wish to update a Mailing Piece first select a line in the table by clicking anywhere on the line to highlight it. The Mailing Piece dialog will pop up. Modify any fields as required. Click Apply (Done) or Cancel. The Apply (Done) saves the changes and updates the Mailing Pieces Table with the new information.
- Cancel any modifications you have started to make to a Mailing Piece. If you have selected a line to Update (modify) and you have made changes but do not wish to keep those changes click Cancel and the changes will be reversed. Clicking Cancel also clears the Mailing Pieces fields enabling you to enter details to Add a new Mailing Piece.
- Delete a Mailing Piece. If you wish to Delete a line, select the appropriate Mailing Pieces line you wish to delete, click delete and the line will delete.
- Bulk Update the properties of multiple mailing pieces at once. To update the properties of more than one mailing piece at a time, select Bulk Update. A new screen opens where you can update the Deposit Location, Deposit Date, Cost Centre or Weight. You can then Ctrl+click or Shift+click to select multiple mailing lines to apply the updates to. Click Apply and all of the mailing lines you selected will be updated.
- Click on the Generate Mailing plan icon
For and import file, if one or more of the Delivery Modes in your selected coverage has become invalid based on the new expected delivery start date, the Delivery Coverage Errors dialog box will display:
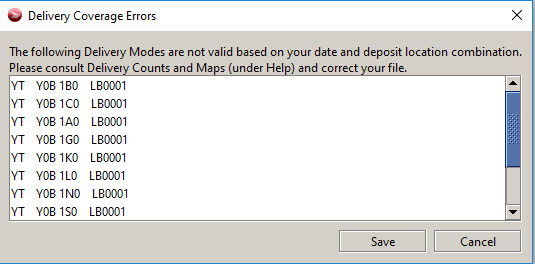
If the Delivery Coverage Errors dialog box displays, you can either:
- Save the invalid delivery modes to a text file. Then adjust your coverage by visiting the Delivery counts and maps to look up if the area's coverage is valid for the delivery start date, or to modify your import file and re-import.
- Cancel the dialog box to return to the Describe Mailing screen and modify the deposit details to retain the walk(s)
- one line for each individual Mailing Piece.
- Validation
 or
or  : Once the Business Desktop 2.0 has performed a validation you will see either the or . Validations occur when you Save, Preview, Generate Mailing Plan, Finalize or Transmit. If the displays you will need to select the Mailing Piece, modify the details, Update or Delete and Validate once again.
Note: if you have a validation error you wish to correct you must:- select the Mailing Piece line with an error, the Mailing Pieces section will populate showing the field(s) with errors
 .
. - correct the entry,
- click Update or Update All (if you have multiple lines to update).
- validate by clicking Save, Preview, Generate Mailing Plan or Finalize.
The Validation field does not update automatically, it remains as the previous value until you Save, Generate Mailing Plan, Preview or Finalize.
- select the Mailing Piece line with an error, the Mailing Pieces section will populate showing the field(s) with errors
- Title of Mail Piece
- Version Specific: will display Yes if there are more than one version (i.e. more than one Title of Mail Piece).
- Weight
- Deposit Location
- Deposit / Start Date
- Pieces
- Cost Centre
- Reference #1
Next Step:
Generate Mailing Plan
Review Mailing Plan
