
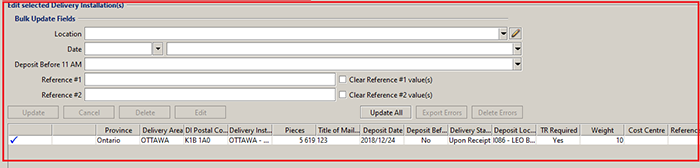
Edit Selected Delivery Installation's
From here you are able to select specific Delivery Installations from the Delivery Installation Table and:
- Bulk Update Fields
- Modify Pieces Information or Delete the Delivery Installation
- Export or Delete Errors
Bulk Update Fields
You are able to apply updates to more than one Delivery Installation if required.
To Bulk Update fields:
- Select the Delivery Installations you wish to update from the Delivery Update Table. You are able to select one or multiple lines
- Update the following:
- Location
- Date
- Type of Date
- Deposit Before 11 AM
- Reference #1
- Clear Reference #1 value(s)
- Reference #2
- Clear Reference #2 value(s)
Location: if you wish to deposit the mail for this Delivery Installation at a location different than what was specified in the Describe Mailing tab, select a location here. (i.e. direct to Delivery Installation). The list displays the Favourite Postal Outlets that have been selected in your data maintenance. You are able to edit this list by clicking on the edit icon. The Data Maintenance Favourite Post Office will open.
For more information on setting up Favourite Post Offices see the Help topic: Favourite Post Offices
Date: select the date this mailing piece will be deposited or the date delivery is to start. The date must be a business day; cannot be a Saturday, Sunday or Holiday in the Province of the Deposit Location.
Note: You are able to enter a different date for specific Delivery installations (partial mailing).
Note: If you modify the Location or Date for deposit and update the mailing pieces in the Review Mailing Plan tab, the expected delivery start date for each Delivery Installation will be recalculated. This could affect the householder counts and routes, which might result in some routes becoming invalid. In this event, a message will display showing the invalid routes.
You can either:
- Click Close and Cancel your modification on the Review Mailing Plan tab, or
- Click Close and click on the Describe Mailing tab to proceed with your required changes to the deposit date or deposit location fields and regenerate your mailing plan. All counts and routes will be updated to reflect the householder data applicable to the expected delivery start date.
- This is the date of first or only deposit, delivery to start Upon Receipt
- This is the date when delivery must start
Deposit before 11: select either: Deposit(s) will be done before 11 AM or Deposits will not be done before 11 AM. This influences the calculated deposit date when a specific start date mailing is deposited directly to a delivery installation.
Reference #1: optional, enter a reference (maximum 20 characters). If you enter a value in the reference #1 field on this Review Mailing Plan screen, it will overwrite the value you entered in the reference #1 field on the Describe Mailing screen (if applicable). If you use the reference #1 field in the Describe Mailing screen, this value is "attached" to the mailing piece you are describing. Using the Reference #1 field in the Review Mailing Plan section allocates the value of the field to the Delivery Installation (i.e. prints on the container label in relation to the Delivery Installation, not the mailing piece).
Clear Reference #1 value(s): select this if you wish to clear Reference #1 from Mailing Pieces and selected Delivery Installations.
Reference #2: optional, enter a reference (maximum 20 characters). This reference is for the specific Delivery Installation and will be printed accordingly on the appropriate container labels.
Clear Reference #2 value(s): select this If you wish to clear Reference #2 from selected Delivery Installations.
- Click Update, Cancel or Delete, the fields will automatically validate.
Update: saves the changes and updates the Delivery Installation Table with the new information.
Cancel: reverses any updates / changes if you have entered.
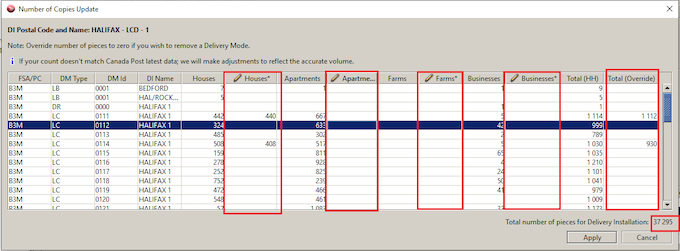
Delete: the selected line(s) are deleted from the mailing. - Edit: opens the Number of Copies Update window where you can edit the counts in the Override column (see next section)
Modify Pieces Information
Allows you to override the number of pieces if required .
To modify or Delete a Delivery Installation:
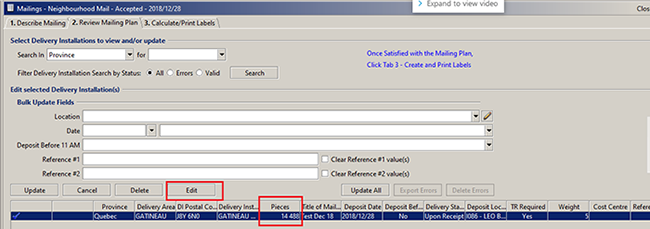
- Click on Edit or double click on the Delivery Installation line
- Number of Copies Update opens for the Delivery Installation. The table displays the details for each geographic area in this Delivery Installation (FSA/ Postal Code, DM type, DM ID, DM Name, and the Delivery Mode Householder counts.)
- Select the Delivery Mode you wish to update by clicking anywhere within the line to select and highlight.
- Enter Override value. If you wish to Delete a Delivery Mode enter 0 (zero) in all of the householder counts House* Apartments* Farms* Businesses*. You can lower the volume for each house holder count. The Total (HH) will display the original total and the Total (Override) will display the new total after changes have been entered for each row.
- Click Apply and the Total Number of Pieces in the Delivery Installation will update. The Number of Copies Update will close and the modified pieces will be updated in the Delivery Installation Table in the Review Mailing Plan tab.
Delivery Installation Table
Each line displayed in the Delivery Installation Table represents a Delivery Installation. The information displayed in the table is read-only. To view details and/or update a Delivery Installation displayed in the table you must first select a Delivery Installation line in the Table and the details will populate in the Mailing Pieces section.

In the Delivery Installation Table you are able to view:
- one line for each individual Delivery Installation.
- Validation
 or
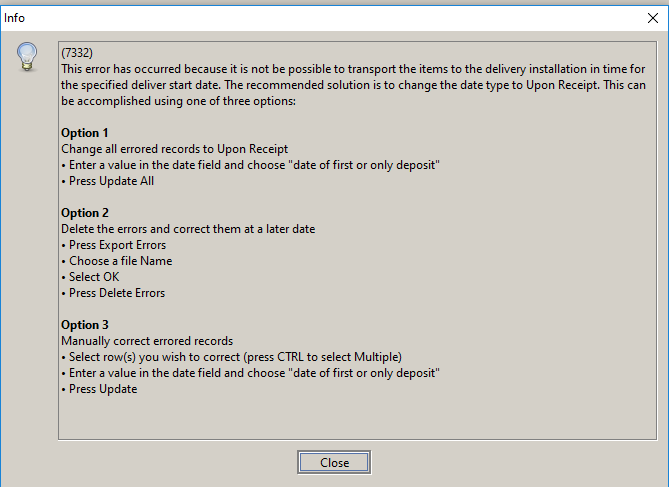
or  : Once the Business Desktop 2.0 has performed a validation you will see either the or . Validations occur when you Save, Preview, Generate Mailing Plan, Finalize or Transmit. If the displays you will need to select the Mailing Piece, modify the details, Update or Delete and Validate once again.
Note: if you have a validation error you wish to correct you must:- select the Mailing Piece line with an error, the Mailing Pieces section will populate showing the field(s) with errors

- correct the entry,
- click Update or Update All (If you have multiple lines to update).
- validate by clicking Save, Preview, Generate Mailing Plan or Finalize.
The Validation field does not update automatically, it remains as the previous value until you Save, Generate Mailing Plan, Preview or Finalize.
- select the Mailing Piece line with an error, the Mailing Pieces section will populate showing the field(s) with errors
- Province
- Delivery Area
- DI Postal Code
- Delivery Installation Name
- Pieces
- Title of Mail Piece
- Deposit Date
- Deposit Before 11 AM
- Delivery Start Date
- Delivery Location
- TR Required: Transportation Required. Yes is displayed if you are depositing your mailing to one location and Canada Post will transport it to each Delivery Installation for you.
- Weight
- Cost Centre
- Reference #2
- Target Area
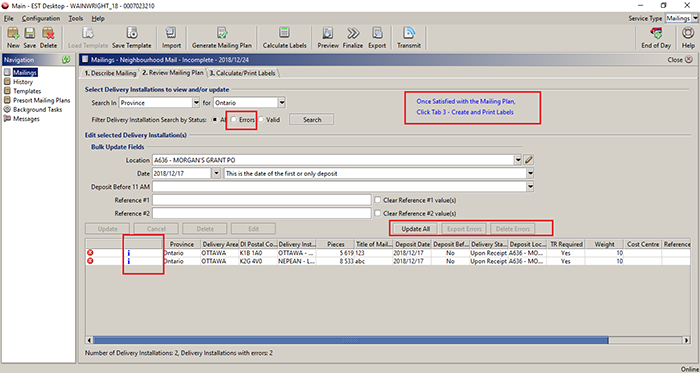
Note: we've added the following features
Automatically filter for errors
Information Icon ![]() to describe process for correcting errors
to describe process for correcting errors

Update All button can be used to update more than one delivery installation at a time
Export Errors button can be used to export the errors
Delete Errors button can be used to delete any line items with errors
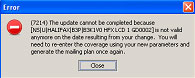
Example of error message
Next Step: Calculate / Print Labels
